Showing posts with label handmade guitar. Show all posts

Friday, September 12, 2014

My Guitar Is Built!

In front of the Steinway
The Buildmyguitar project is finished, and so is this blog, for the most part. There will be one more next week, just to tie it all up. Bruce Roper, the luthier from the Old Town School, reset the neck Friday morning to get the action closer to proper, then adjusted the tension rod and then we sat down to play.

I'm not one for bragging, but it was close to perfect, and will probably end up being perfect after we do some tweaking next week, put on strap pegs, cover the tension rod adjuster hole and maybe stick a little strip of wood under the saddle to replace the piece of plastic we stuck in there Friday just to get the saddle to the right altitude.

I took the guitar straight home and sat it in a couple of different places just to see how it would look. Best of all was this spot in front of the Steinway, one of my other favorite instruments. But it didn't stop there.
Atop the Steinway
I decided I wanted to see how it would look up on top of the Steinway, where it joined a cigar box guitar a guy made for my son, one of the guitar repair experts at Guitar Works in Evanston. The new guitar sits up there pretty well, I think. But a Steinway kind of earned its own space in the house, so I don't want to clutter it up with too many things. The guitar deserves its own space, too. I just haven't decided where that might be. There are lots of guitars in the house in various places, but this one deserves its own, at least while I am still so tickled about having it. I am well aware that the day will come when I view it as another good musical tool in my collection of good musical tools. But that's a bit down the road yet.

I would be a crass fool if I didn't stop here to thank Bruce for his dedication and patience with this guitar, and with me, over a period that began in February at Owl Lumber in Des Plaines and ended when I walked out of Bruce's shop off Lincoln on Friday afternoon. He has patiently answered all questions and never even once elbowed me out of the way as I pushed close with a little camera to get a shot.

I really enjoyed working with him on the blog. He is a funny, gifted man with a master's touch on the chisels and saws and other pieces of equipment that helped this guitar come together. I thought in the beginning that I knew what he meant when he said this guitar would have excellent chatoyance, but you can really see it, even by the light of a Nikon flash, as it sits there on top of the piano.

The finish isn't shiny. We agreed on that early on. It has a couple of coats of shellac on it, then a couple of coats of gun oil on top of that, with some light sanding between the layers to get rid of any bumps. I have to say the finish is what makes it so beautiful. A lot of gloss on this one would only ruin the sense you should have that you are looking at something that was once a tree.

That is more true of this guitar than of most guitars. It is solid sapele, back, sides and top, all cut from the same piece of wood. We turned away from spruce or cedar, more common guitar tops, to craft this instrument from one solid tone wood. I was surprised when I hit the first chord on Friday. It's loud, but not harsh. I counted 15 seconds of sustain from a simple harmonic on the "e" string, and that's a real tribute to the guitar. It held its tuning through about 40 minutes of playing at home, everything from "Mood Indigo" to "Deep River Blues", "The Sinking of the Jeannie C", "Freight Train" and "Don't Think Twice" played against the music from a chunk of the Pachelbel Canon. That one sounded great. The guitar fairly screams and moans when you play the blues, which is not too much of a surprise since it is modeled on a Gibson Nick Lucas from the 1930s, long a favored acoustic blues guitar. I worked it on "Trying to Win," and some of my own blues songs. It stands up to all of it and fairly well dances on some. Lovely.

With the pots and pans in the kitchen
I played it for a while in the kitchen to see how that would sound, then took a shot of it with pots and pans. I don't know why. It's just lovely anywhere you sit it.

I got to thinking about this a lot over the past week because it is very rare that a player would get to see a whole guitar constructed, from a slab of wood right up to the stringing and playing. What an honor that was for me. I have played guitars since I was about 14 years old but I never appreciated them so much as I appreciate them right now, thanks to Bruce and his skills.

I been to C.F. Martin in Nazareth and walked through the 300 steps they use to build them, and I have visited with Jean L'arrivee in Victoria, B.C. (and Vancouver) to see how a smaller operator put them together. But in both of those cases, there were a lot of people working on the instruments, so you couldn't actually have a sense that one person built any of them. I have an old Martin that was built that way in 1958, and it's different.

But not like this. It's built by one human for another human. Each part has Bruce's thought and action attached to it. I would argue it has something of his voice, the special part of a guitar that you just can't define. I saw him identify the problems and fix them. I saw him decide just how much to trim from the neck to make it sit properly.

I can't thank him enough. If you want an instrument made for you, he's the man to see.

Come back one last time. Maybe you can hear it play then.


Saturday, September 6, 2014

Last minute things before the guitar plays!

If it isn't one thing it's another.

Actually, it's a lot of things, and another, and then some.

But this guitar is just about ready to sit down and start singing. There are some final, delicate things that have to happen before that event. So let me explain. Here it is:

Almost done!
As you can see, it's strung up and it looks ready to play, but it's not. On Friday, Sept. 5, Bruce Roper, the luthier at Old Town School, made the nut that goes under the strings at the top and the bridge that goes under them at the bottom. Then he voiced the big and little "e" strings to make certain the saddle would have the proper angle for all the strings to play in tune. Then he decided, remarkably with just his fingers and his eyes, how he should slot the white nut at the top so the strings would be just the right distance. Then he reamed out the rest of the string holes in the bridge. Then he strung it all up and handed it to me and said, "Play it."

It was terrible to play, for sure. The strings were waaaaay off the fingerboard, hard to push down without distorting the note. But you could get some chords out of it, and some notes and guess what, terrible to play or not, this guitar has a fine, strong voice that will sound wonderful when Bruce gets all the adjusting and shaving and fussing finished. I am certain he knew it wasn't ready. But he did want to hear it and so did I. We've been at this since last February, and to see it go from a big slab of sapele at Owl Lumber in Des Plaines to what it is today has been nothing less than inspiring. I don't want to imply there is any magic to guitar building at all. It's just that players don't usually get to see what goes into what they are playing. I know every millimeter of this guitar now. I bonded with it well before I played that first difficult chord. I might just call it "Love Child" (but don't quote me.)

This is the point at which you thank God you have someone fussy working on the guitar. I'm not saying someone fancy (which we will discuss in a while) but someone fussy. A guitar that won't play in tune will spend its days hanging on a wall someplace gathering comments, but not sending out any sweet songs. All of this is called "setting up" the guitar. Bruce has done this maybe a thousand times in his life so he is comfortable with everything he has to do to make it work right. We got into a big conversation about how fancy we wanted to make this guitar before it's finished and I'm sort of leaning toward, "Let nature be the fancy" because the wood is so lovely. I'm even rejecting the idea of a pick guard because, first, what the hell am I going to do to it that I need a pick guard? And second, look what happens when you put a pick guard on it:

Probably a bad choice
To my mind and eye, the pick guard almost completely ruins the lovely waist that is built into this guitar, with its grand shoulders and its elegant hips on either side. Put the pick guard there and it takes something away from the form of the thing. And in this guitar, the form of the thing is important because of the chatoyance in the wood and the matching all around. So no, no pick guard. I thought maybe one of those fancy clear plastic things Jean L'Arrivee uses on his guitars, but Bruce says those can yellow and get dirty around the edges and draw too much attention to the wrong thing.

I've never been a piss pounder on any of my guitars. I don't think there is a violent mark on any of them (and I have lots of guitars.) I loaned one of my Martins to a woman singer once and she returned it with big, sweeping scratches from the neck down across the top front of the guitar. She never held that guitar again and went off on her own way to wreck someone else's instrument. I was that angry about it.

Bruce says he wouldn't mind if I dinged it up a bit, or even a lot, over the years, because it would mean that I was playing it hard and often. Fair enough. But I don't want to plan to do that. This one is such a keeper, I want people to be swept away by its beauty. Bruce would say that's bullshit, that what you want to sweep them away with is your music. The guitar is just a tool in that process, and I have to agree with him. So the challenge will become writing music up to the beauty of the guitar. That's a good challenge to have.

It's crazy to get enthused about the wrong things. That was the lunch time conversation with Bruce over cheap but delicious hamburgers. Some luthiers and their advocates talk about these instruments as though they were special gifts of God delivered thru blessed hands given a magical gift at birth. There is none of that to Bruce in guitar making. Each one of his instruments is individual, and he knows that because he has made each part himself. He doesn't sweat over much of anything. If it all comes together well and plays well, he is happy. The older it gets, the better it will be. The more it is played, the better it will be.

These are very healthy thoughts to have for a luthier because they put the person in the same camp as any skilled craftsperson. Furniture, for example, can be just lovely if it is constructed properly. But no one would think it was a gift handed down from God. Violin makers take on the same, mystical essence sometimes. But not all of them. Some of them recognize its just a bunch of wood prepped up by someone who knows how to do and what to do. In the case of my guitar, you might someday see it and say, "That must have been a lovely tree!" and I would agree. But I don't think I want anyone fainting over the building or playing of it.

Bruce is one of the most practical men I have ever met. Musically, he writes brilliant songs and performs them so well with the Sons of the Never Wrong, and I am certain many a heartbroken guitar owner has had his concerns eased by Bruce's repairs. But if you are looking for mysteries, I am certain he would say, try a church someplace, because there are no mysteries in a guitar.

Take a look at this and you will see what I mean:

Making a nut and saddle

That white thing he is slicing at on his bandsaw is a piece of Corian that was born as a little cheese board. The minute he saw it, he knew what it would be good for. Corian cuts like wood, sands like wood, even glues like wood, but it's not wood. It's harder. So it makes a great nut and saddle for a guitar. That's what Bruce is doing above, cutting out a nut for the guitar. Some luthiers would view this as heresy. Bone! That's what you want! Bone. Nope. Corian is just fine. It has nothing to do with tone. It just holds the strings in exactly the right place for the guitar to play well. It would be hard to pay more than $20 for a whole sheet of it.

You cut it and then you use this machine to form it the way it needs to be formed:

Grinding down the nut

Bingo! You have yourself a nut.

The same process works for the saddle down at the other end of the strings. It's a little more complicated because it has to fit into a slot Bruce will cut in the actual rosewood bridge with his Dremel tool.
Slotting the bridge

Cutting the saddle slot is a little tricky because you can't just drag the bit of the machine down the line and cut out the wood. Instead, Bruce uses it as a plunge router, taking out little cuts at a time. That way the bit never overheats or gets jammed up. One clean pass after he has made about 20 little holes clears it all out. He repeats the process a couple of times to make sure the slot is deep enough. It has to be strong enough and deep enough to hold the saddle in place against the tension of the strings. Too shallow and the strings will pull it out of the slot, or maybe break it.

Once that is completed, the rough stuff is over and it's time to voice the guitar. Bruce puts the Waverly tuners back on and then gets the big and little 'e' strings. You do this, Bruce says, by stringing up the e's and then putting a little nail like block under the string down at the bridge to see how close it is to accurate. And how would you know that?

If you just touch a string at half its length, then pluck it, what you get is a bell shaped note. The same things happens at an octive, and a lots of equal points along the line to infinity. These are called harmonic notes and they can NEVER be wrong. Push the string down to the fret and what you get then is a fretted note and these can be wrong a lot. The objective is to have the fretted note and the harmonic note issue exactly the same pitch, which you measure with a tuner.

It takes Bruce just a few minutes to complete this task on the small "e", then he takes a white wax pencil and makes a mark for where that part of the saddle should sit. Then he does the same thing with the big E string and makes that mark. Then he connects the two marks with a line. That should be exactly where the saddle sits on the bridge.

I become impatient during this process, which makes me wonder whether I will have the chops I need to build a guitar later. Maybe not. We will see.

The bridge with saddle in place
This is what it looks like when it's finished.

So then Bruce strings up the whole guitar to see how it sounds. I get to play one chord then give it back to him.

He plays one and announces he is going remount the neck with a little more back end to it to pull those strings down closer to the fingerboard. He will use shims on the neck where it hitches to the guitar to do that. He will trim the nut and the saddle to get the heights just right.

But that's for next week.

Come back please!

Wednesday, August 20, 2014

Crossing A Crucial Bridge

Well, Bruce Roper and I have reached the last couple of visits on the Buildmyguitar project, and I'm happy to say one of the most complicated parts of them all comes just about last. Take a look at the guitar as it sits right now:

It's all but finished. What's missing is the bridge, the tuners, the nut and the saddle. The bridge and the saddle are the reasons the neck isn't attached yet. We're moving into that frightening world that is a mix of math and geometry, and the calculations Bruce uses will determine exactly where the bridge should sit on the body of the guitar, and then how the neck should be placed to make certain the intonement is just perfect.

But we didn't start the day at Bruce's shop. Instead, we went to Guitar Works in Evanston, where the folks in charge let us peer into this guitar:


This is just the top. I put it here like this to show you the name, "Greven", which is an important name for Bruce. Greven works by himself in his shop in Portland where he turns out just about 40 guitars a year. That's a lot for one person. What is amazing is that they are of such high quality. Here's the rest of the one from Guitar Works (the room was too small to get a good shot).


Bruce and I went to Evanston because we had dropped in last week, saw and played this Greven, and decided to go back and look inside to see what made it so special. And it is special. Finger pick on it, thump it hard, wham it with your fingernails, whatever you do it feels and sounds great. Bruce put his mirror inside and used his flashlight to light it up. He looked around and concluded "damn" it's just like any other guitar, maybe even a little heavy inside in some ways. But the sound is wonderful. The only thing that kept me from buying it is I already have too many good guitars, Bruce is building me another and it would be crazy to add to the pot, especially when I'm not playing them out and making money.

"I don't know how he can do that," Bruce says of Greven's output and high quality. But he does. Greven explained it all at a Luthiers Convention workshop in 2011. It sounds simple. You just line up a whole bunch of wood, form it, glue it, finish it in stages and there you have it, a guitar! If you read the transcript from that workshop, what you learn is that Greven has been making instruments for 50 years and spent a stint running the repair shop at Gruhn Guitars in Nashville. Gruhn Guitars is like Mecca for acoustic guitar players. It's where failed country stars can sell their best stuff, where the biggest names got their instruments tweaked or repaired, and so on. Greven learned a lot there and built it into how he constructs his own guitars.

Bruce has an immense respect for Greven and he bows to the man and his processes even as he builds my guitar. Back to the bridge story!

Using a fret tool to measure distance

Because everything has to be just right after this point, Bruce uses a fret measurement tool to find out where he is going to place the saddle in the bridge on this guitar. He marks the spot with a white grease pencil. Then he brings in the bridge to position it over that spot. It has to be square and lineup with the center line on the instrument.

Positioning the bridge
When that's done, he has to find a way to cope with the fact that the top of the guitar has a gentle arch and the bottom of the rosewood bridge is absolutely flat. To accommodate that curve, he tapes a piece of rough sand paper to the top of the guitar. Then he slides the bridge up and down on the sandpaper, creating the same arch in the bridge as the one that defines the top of the guitar.

Sanding the bridge to match the guitar top.
 Every few minutes, he vacuums the dust from the paper and watches closely as he starts the sanding process again. He is looking for the point at which everything is sanding evenly, which means the shaping of the bridge is complete.

Scraping an area for the bridge
When that is done, Bruce takes a very sharp chisel and scrapes the finish from the part of the top that is covered by the bridge. (He used an Exacto knife to create an outline just inside of the edges of the bridge. This is because you never glue wood to finish. You can only glue wood to wood if you want it to hold. He creates the clean space on the top of the guitar for the bridge.

Putting glue on the bridge and the guitar
See the holes in the guitar top? Those are the holes that will ultimately hold the big and little "E" strings. But for now, they will serve as guide posts and anchors to glue down the bridge.

Posts and bridge clamps in place
It's almost finished now. By the time Bruce is done, every fraction of an inch of the bridge will be glued tight. It's sitting just above the bridge plate glued on the underside of the top way back in March. The edges of the bridge are glued directly over the x-braces that run diagonally under the top of the guitar. Put it all together and it's a very solid package to hold a couple of hundred pounds of string pressure.

The last step
After the bridge glue dries, Bruce will be setting the neck. If you look at his bolts and the joint above, you can see there are spaces to trim face wood and bottom wood, which will give him the set he needs to make sure the neck and the bridge are in alignment.

We're just about there.

Come back.


Tuesday, July 29, 2014

Special Finishing Touches

Here's something you should see before it's finished:


It looks kind of like a bird, but it's not a bird at all. It's a spark, or maybe a special star. I don't know. It's a little design Bruce Roper decided I needed on the top of my guitar, and I completely agreed. He drew it on paper first then etched out with a wax pencil on the guitar head.
Almost all guitars have something to identify themselves up on top. But typically, it's just going to be a brand name. Gibson is distinctive. C.F. Martin is distinctive, too. The rest of them all have their look, but the common nature of them kind of diminishes them, to my mind. So I told Bruce to be as creative as he wanted to be without going outside the boundaries of taste. He already has a relief "M" in the top to identify it as Madigan's guitar. The little flash you can see here will make that even more clear.


How he does it makes it even more interesting. Were he using Mother of Pearl or any other kind of flashy insert, he would have to cut the space to the exact size then the perfect depth then inset the piece of whatever he is using. He might even have to cut the pearl in a design, which is a tedious, difficult process best done underwater because of the effect pearl dust can have on your lungs.

Bruce has found an easier way.

Dental acrylic. Yes. That stuff that gets put into teeth. It's hard as a rock once it sets, doesn't expand or shrink with humidity and looks grand when it's finished. He will mix a paste of epoxy and dental acrylic powder to create a pearl-like goo that he will dab into the impression he has made on the head of my guitar. Then it will set and he will run the top through a belt sander and what comes out looks just like a fancy inlay, but all the risk has been taken out of the process. The hardest part is drawing the symbol and cutting away some hardwood with an Exacto knife with a fresh blade.


It's not a difficult cut, but it takes a lot of pressure that has to be kept away from the outside of the blade. You don't want to disturb the fibers in the adjacent hardwood (rosewood) or the inlay will have what looks like a dent in it. Bruce works patiently with the Exacto Knife, chipping away at the wood. He lifts out tiny particles at one time. I could see myself wrecking this in a hundred ways, but as I watch, Bruce talks about inlays and masterfully slices away.

I can't show you what it looks like this time, but when we get back to it in a few weeks (vacatus interruptus!) it will be sanded down and ready to sparkle.

My lust for this instrument grows as though there were a teenage boy inside of me watching the neighbor lady wash her Thunderbird in a halter top and bikini shorts with lots of soap and water and lots of shifting around.

Wait a minute! Where did THAT come from? There is no place for the suggestively subjunctive mood in a story about building a guitar.

Or is there?

Let me just put it this way. I already love the look of this guitar. I can hardly wait to play it. I can hardly wait for you to hear it.

That's what I meant, without the halter top, bikini bottom and lots of soap.

The rest of the visit was taken up by what might seem a little tedious, but is very important. Bruce worked at sanding the neck and taking out any bumps or rough spots. Every few minutes, he handed it to me to ask me how it felt, then made adjustments.


All of that made me feel pretty special. No one has ever made a custom guitar for me and I like the process a lot. So much, in fact, that I might make one myself when this one is finished. We moved it outside before we started and took a picture with one of Bruce's other guitars for comparison.


Please come back in a few weeks when we finish this project. It needs more gun oil, more adjustment and a couple of final things.

Then, music!

Tuesday, July 15, 2014

Just About Ready for Picking...

It Looks Pretty Good At The End of the Tunnel!

Take a look at this!

Not quite done, but done enough to tell how it will be


This is Bruce Roper putting some not quite finishing touches, but fascinating touches nonetheless, on my guitar. The Build My Guitar Project is almost over, certainly by the end of the summer. You are probably wondering what is taking so long. The answer to that would be "Nothing, it's taking as long as it takes."

One of the important lessons for me, a man who spent a lifetime meeting and beating deadlines and grinding pretty good stuff out as quickly as I could, is learning the pace of something that simply takes more time. Bruce picked the wood for this guitar when it was still a big slab out in Des Plaines, cut that slab into guitar sets and began the meticulous process of building my guitar back in February. I have watched every step. One of the first things I have to say is if you want to learn how to build a guitar, Bruce is the man to see.

Why?

Take a look at this.

Taking a fine measure at the bottom of the neck

Bruce is measuring the little legs he built into the base of the neck of this guitar to make certain it sits flat on the top of the instrument. But he's not measuring them to make sure the slots he cuts for them are exact. He is measuring them because the slots have to be a little loose. This part of the effort is all about setting the guitar neck in the right place, a mixture of mathematics, geometry, craftsmanship and, perhaps most of all, patience. When he starts cutting, Bruce could easily lop a huge whack out of the guitar whenever he wants to. His tools are very sharp and he knows how to use them. No. From here on out, things happen a tiny slice at a time. It's the only way to make certain everything is going to fall into the right place. He's going to need some room to make the neck fit just the way it should. This is where you walk into a world where everything becomes a little unforgiving. So he doesn't want to make any mistakes.

He is using a utility knife here to score the top of the guitar so those little aluminum braces will have slots to slip into. If this guitar top were made of spruce, like most of them, he could cut this just using his utility knife. But it's sapele, a pretty hard wood, so he is going to have to shift soon to a Dremel tool to cut away the rest, then fine tune the slots with chisels. This part of the effort gets a lot of attention because it is a weak spot on most guitars. Bruce knows that after 30 years of repairing them. There's nothing much to vibrate and create sound up at this end of the box, so he is comfortable inserting a little more support so the neck sits flat and the top doesn't move. Thirty years from now (when I am 95....shit! Make that 15 years from now, when I am 80....SHIT! Make that a decade from now....Sh....never mind) Bruce wants these guitars to be as solid as they were on the day he finished them. That's great, because this one is going to get a lot of use over the next 30 ye.....shit! Never mind.


He makes a dozen passes with his Dremel router tool before he is satisfied with the grooves, then slices away paper thin pieces with a very sharp chisel. All the time, he is fitting the neck to see how it sits in the place he is creating for it. Every guitar he builds is different because he is not making a guitar on a factory model. Truth be known, despite the refinements, Bruce could walk into a time machine and step on the floor of any luthier's shop 50, 60, 70 years ago and build a brilliant guitar by himself. It's that individual.

And a little nerve racking for those of us who haven't done this 100 times before.

Another "look at this" moment!

The little top brace channels

The little fingers for stability


See how they will fit together? The little aluminum legs sit right in those grooves. Then they are pulled down by a little block of wood with some machine screws in it that fit into those holes on the legs. tighten it up, and that neck isn't going to move in that direction.

Now it's time to drill what seem to me to be pretty big holes in pretty delicate places. Those are for the neck bolts that hold the neck onto the guitar on the flat plane.

Neck bolts being put into place


Okay, I'm not comfortable with this. You really have to know what you are doing to put bolts like that into a piece of mahogany without splitting a big, ugly chunk off of it. And yet, Bruce gets it done quite neatly. Then he takes his drill to the guitar body and pokes two vast holes in that. I'm starting to sweat. All the time, he's talking about wood and how it works and how some people put dowels into make sure the neck doesn't split and so on.


Look at those babies! Isn't that troubling? Somehow, Bruce gets this all to work without wrecking a single thing. Then he tests the effort and the guitar neck slides into place like it was born there. He will still do some fussing and trimming over it so it fits just right and aligns itself properly with the bridge.

The bridge?

He made one of those, too. It took exactly 21 minutes to go from a rosewood blank to a completed bridge, holes and all.

Here's how it started.


Those are bridge blanks. If you blow this picture up and look closely, you will note that some of them have just hint of pink in them, and we want that. There is just the slightest hint of red/pink in the wood, and a bridge that bonds with that will be very sweet. So we agreed on one. Second from the left on the bottom row. Bruce took it to his sanding machine, cut it down, then found a blank bridge with the right spacing on the holes and used it as a template. Before I knew it, he had the guitar standing with the bridge taped in place.

It's not ready to string up yet. The bridge needs to be glued on, and then Bruce has to decide what angle to give that little saddle the strings ride over. That has to be right. He does it by eye and sound, using two strings to find just the right angle. Then he will cut it with a router and stick a saddle on it. The string holes will be drilled through and...

But that's for the next time.

Please come back.


Thursday, July 10, 2014

The toughest guitar job of all, shaping a neck

From Rough Cut to A Great Neck: A Hard Job Done Well

So, here is the challenge. Bruce Roper has mounted the rosewood fingerboard, the rosewood face plate and finished what he can do on a neck that is square and unshaped. When it's all done, he will bolt the neck from a couple of directions on the guitar body, then we move on to the bridge and the final steps. Just now, the question is how do you go from a squared block of mahogany made from three pieces glued together to a smooth, well graded neck that will be a delight to use because of its shape.

There are lots of ways to do this. In many modern guitar factories, computer aided design and manufacturing mills cut everything to perfect dimensions and hand them over ready to finish and put on the guitar. Bruce. the luthier at the Old Town School of Folk Music, doesn't do that. He is a much more traditional builder (despite some modern updates) and that means he is going to take out his rasps, his tiny planes and a host of other tools and cut away everything but a comfortable neck. Then he is going to cut out the headstock he has designed for me.


He is drawing the headstock design on paper here and getting ready to trace it and transfer it to the headstock with a white wax pencil. He talked about this idea months ago, a cutout at the top of the guitar that would look like a stylized "M" for Madigan, with a copper cap on it that would look a little like the letter "C" for Charles. I had no idea how he would be doing it, but he has worked on it for weeks now and I do believe it works very well. It's a clean design with a twist that will make the top of the guitar look very snappy. He will also put a little sparkle in the face of the headstock, not actually a star, but star- like.

But first, the neck.

This gives you a good sense of what he is working with when he starts to shape the neck. As you can see, it's quite square and angular, even though you can tell it's a neck. He is setting up an oscillating drum sander with a jig he created to sand the head stock to the proper width for the tuners we have selected. We're using Grover Tuners because the ratio is right in the gearing and keeps the guitar well in tune (Not all of them do that.) The headstock needs to be cut down a bit because each of the tuners has a collar in which it sits that rises just above the surface of the headstock. You need enough altitude on the tuner to get a string around it a couple of times. So Bruce cuts it down to do that.

This was an important three hours of work because the neck is about the most personal part of the instrument, even though it might seem the body (with its lovely figuring in this case) is more important. A pretty guitar would be worthless with a neck that is too thick, bumpy, badly made, whatever short of perfect. A guitar made for you, now, that is what everyone wants and few guitar players ever get. We're going to cut this to fit a style of guitar we both loved, an old Guild 6 string. The necks on those guitars were thin, easy to hold, easy to play on. That's our goal.

I'm the first person to admit that as I have aged, my hands have suffered. I used to be able to play all night without a problem, but 40 years of typing and wood working and God only knows what else has left me a little stiff in the hands. A comfortable neck will help with that. It's such an important thing that I won't consider a guitar that doesn't have one. And I will pay a good deal of money for one that does. My Martin D-28 from the 1950s is a delight, as is my Martin D-35S 12 string, which is easy to play and very fast for such a big instrument. I have a Collings that is a great guitar, but is not as friendly on the hands as the Martins. I can already tell that Bruce's guitar is going to be in the high comfort range.

Bruce puts the roughed-out neck on the frame he has designed for neck finishing, holding it down with a couple of luthier's clamps. In his right hand he holds something like a cheese rasping tool, but it's a lot tougher. He uses it to mark the neck at he first and seventh frets at just the right depth. Then he tasks a different rasp and starts slicing away at the mahogany neck. It is very surprising to me how quickly the work goes. Part of that is because Bruce only uses good tools, but the other part is the expertise.

Guitar making is full of little and not so little challenges and problems, and each instrument a hand builder makes presents a new one to solve. Bruce has made his decision about how he cuts his necks, but that creates a challenge up where it hooks onto the guitar. It's awkward to cut, so it takes a little time and some thought.

These four photos give you an idea of the array of tools Bruce has to use to complete cutting the neck.

Rasp rough cuts and takes away big slices of wood

Grater is a little more specific

Simple hack saw to cut the heel

Maybe Bruce's favorite new tool, a rasp that has randomly placed teeth.
It leaves no marks in the wood.

Maybe two hours after he starts this process, nothing looks the same as it did at the beginning and I'm just standing there thinking, "How did he do that so perfectly?" The answer is simple. He is careful and he knows how. During this process, Bruce ran through a little speech on mistakes and how they change your approach toward what you do. My sense is that this is an ongoing process that won't ever stop with Bruce,  and maybe is not a bad way to look at doing anything worthwhile.

Just about completed


Bruce is rightly proud of this part of the neck. He cuts it to look something like the prow of a ship, then trims away the sides and the front to give him the great slope he needs to finish that neck. Everything will be smoothed out and sanded over the next few days.
Once the neck was cut the way Bruce wanted it, he immediately shifted to one of the nicest grace notes on the guitar, the head stock cut that will identify it as mine. Lots of guitars say Gibson on top, or C.F. Martin, or Guild, or Collings. This one is just going to say CM, in its own way, with a little star-like sparkle beneath the stylized letters.


This is where Bruce moves comfortably into uncharted waters. Bruce has drawn the pattern for the cutout on the headstock and is using his small bandsaw to nibble away at it, just a tiny slice at a time. You can see from the wax pencil drawing how the cut out is supposed to look when Bruce is done. He is very meticulous about this because it's one of those things you just can't fix if you screw it up. This is a good lesson in why people who build guitars (or anything, actually) need to take things slowly.


Add a little work with some files and some sanding and there you have it!

An "M" for Madigan at the top of it all. Lovely.

Come back soon to see what's going to be next. We're close to a finish.

Tuesday, July 1, 2014

Necking with Bruce! (Not THAT necking!)

I have been waiting for this point for months, this chance to neck with Bruce Roper. Guitar neck, that is. But first, a status picture. It gives you a sense of what a beautiful guitar Roper builds.

We're so close to finishing this I can almost hear it. The beauty of this guitar is simply overwhelming. It doesn't even have its final coats of finish on it yet and it already looks like a catalogue model! I took the body home Tuesday to help with some humidity problems.

I'm at the point now where I regret even mentioning those humidity bumps in the last blogs. I'm such a journalist (still) looking for drama, or sex, or whatever (Necking with Bruce...pretty clever, no?) that I made way too much of it. Sorry Bruce and sorry to the readers for getting obsessive about these kinds of things.

Someone should just slap me.

(No, I'm just kidding.)

All guitars have their flaws, and it's every builder's challenge to finish the instrument so you never know what or where they are. Even the old Martin guitars have that annoying crack between the end of the pick guard and the bridge. It's a function of when the finish is put on and when the pick guard is put on, I've been told. I have two Martin guitars and I would have even more if I could because, crack or not, they will sit you right back in your seat when you hear them because they are that good.

It's crucial to always remember that guitars are about sound and emotion.

How they look? Ask Willie Nelson about Trigger!

Trigger. Photo from John Bell Photography
Not the kind of thing you would expect to see in the museum of snappy pretty guitars, huh? But it sounds just about as good as any old nylon stringed Martin is ever going to sound. Nelson won't give it up.

For the record, no one is going to wear a hole in mine. It will not have a name. There will be no autographs on it except for Bruce's, which you can't see. So, onward...

Guitar necks are inherently mysterious because no one can actually see what is going on inside of there. Hundreds of pounds of string tension are all aimed at pulling them out of line, yet they don't shift (if they are well built) because luthiers account for those kinds of stresses.

Here's Bruce's solution to a couple of stress problems he has encountered, what, hundreds of times in his 30 years of repairing instruments at his own store and then for the Old Town School of Folk Music's Different Strummer shop.

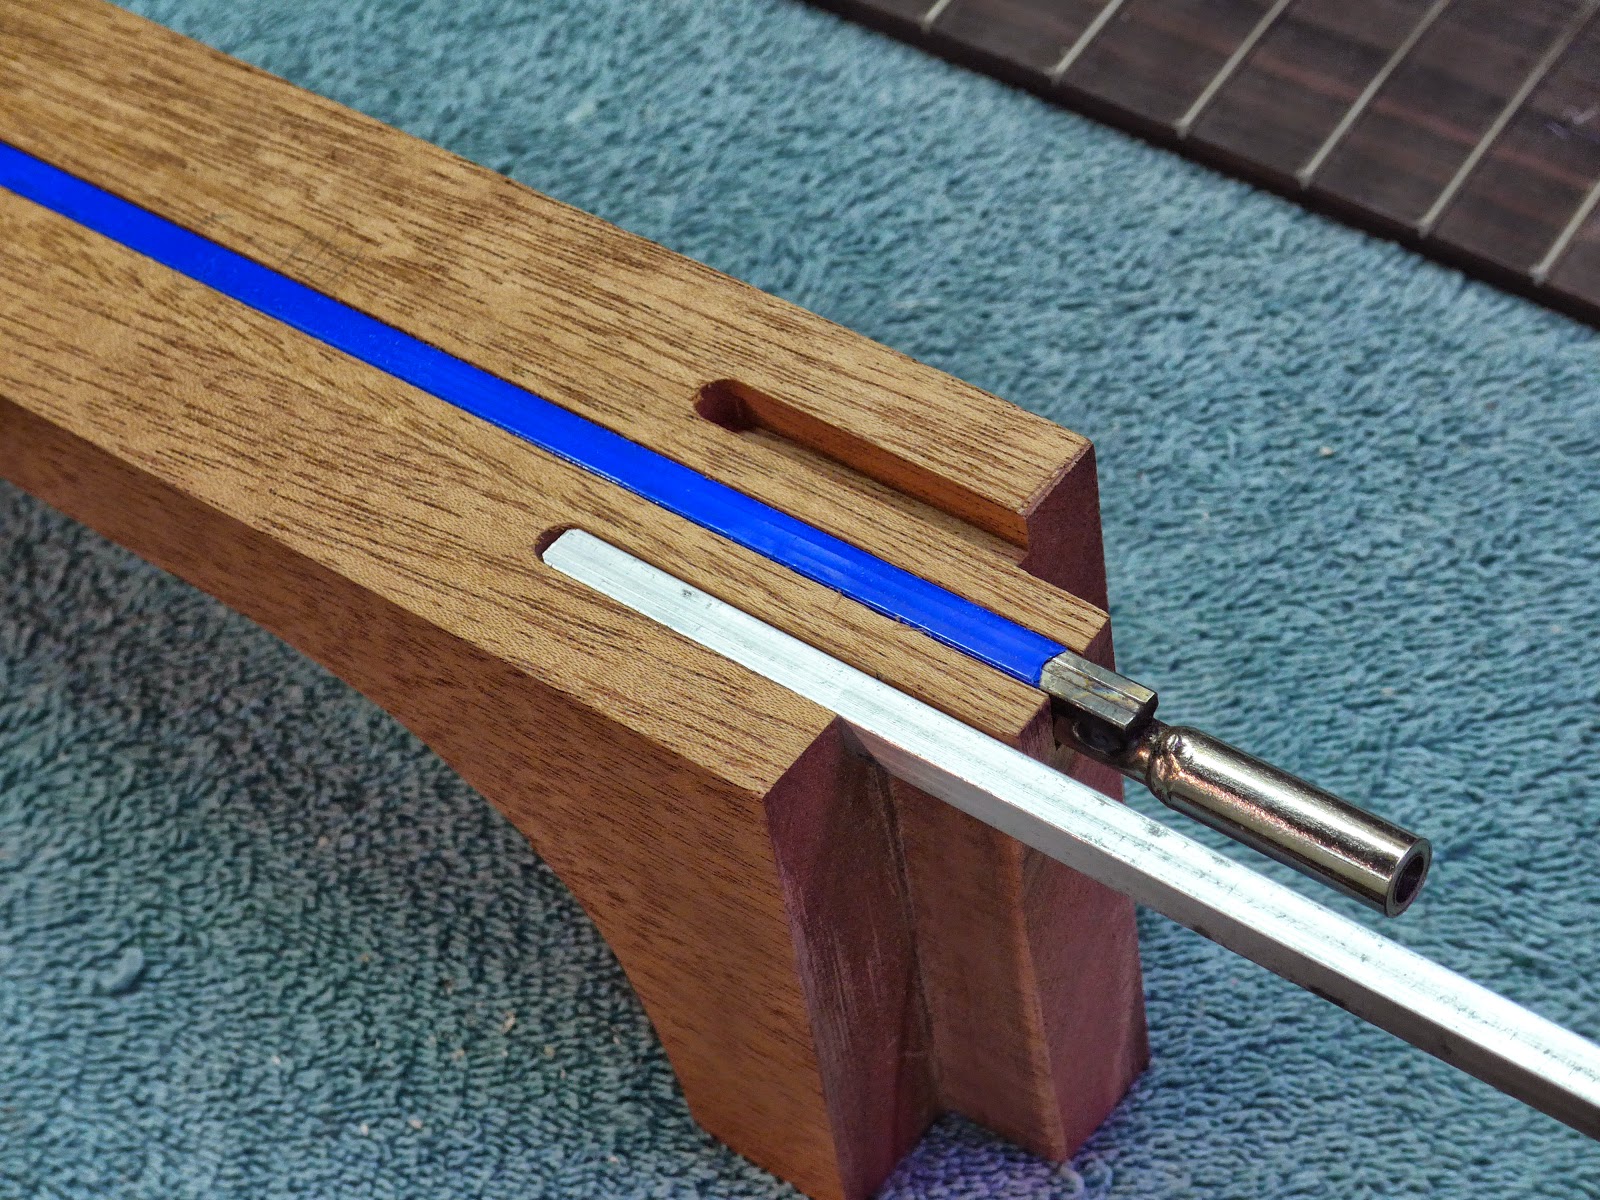
Troughs for aluminum braces

A brace, one of two, in place

This is the heel of the neck, down at the end that hooks onto the body of the guitar. That blue thing running down the middle of the neck is the adjustable tension bar that helps keep the proper shape in the neck despite changes in temperature and humidity. The wood thing coming off the bottom of the neck is a tenon that will fit right into a slot of its size on the body of the guitar. That aluminum bar is one of Bruce's crucial refinements. When he is finished working it over, it will provide a remarkable stability on one of the crucial guitar weak points, the top where the neck fits in. Two of those aluminum struts will be screwed into the fingerboard to make the guitar end of it, the part that fits over the top of the guitar, rigid. It's not going anyplace, in other words.

Best of all, no glue to put it together. It is traumatic for all parties involved to have to remove the glued neck from a guitar. But you can't reset if (inevitable after many years of playing) without doing that and even with great caution, you can damage the guitar quite a bit prying the neck off.  That's because it's glued in a couple of different directions, not the least of which is to the top of the guitar.

Bruce's (and increasingly a lot of other makers) don't work that way.

The neck will be bolted on and as an extra little bit of stability, the fingerboard will be screwed to the ends of these aluminum braces.

I have always wondered how luthiers get their fingerboards to stay in place once they have spread glue all along the neck (and the fingerboard bottom). There is a tiny secret.

Centering the fingeboard

There is a tiny nail beneath the fingerboard to hold it exactly in place as the piece is being smooshed onto the neck. Bruce uses that nail to hold the top of the fingerboard in place as he aligns the bottom with the heel of the neck. Very dandy and leads to a perfectly placed fingerboard.

It takes lots of clamps to hold this down to dry, because this glue joint is one of the most important in the guitar. It must resist all those tensions, never shift, never break away from the neck and stay flatly in place, no matter what. 

Clamped and drying
Everything is going to sit for about a week now. Then we'll gather for some of the final touches. Bruce will put the neck on, the tuners and locate the perfect spot for the bridge (where the strings hook on). We'll also look at some final finish points that will make this my guitar, no questions asked.

Please come back.